Set up logging pipeline with fluentbit, ES and kibana
Set up logging pipeline with fluentbit, ES and kibana
A centralized logging system can be indispensible in evaluating the health of multiple services deployed in a kubernetes cluster (incluiding the cluster itself). This can be useful in troubleshooting and optimization of services.
In this tutorial, we are going to set up a logging pipeline that will include 3 distinct components
- FluentBit
- Used to collect, transform and ship log data to ElasticSearch. Fluentbit is considered faster and lighter than other alternatives such as fluentd and logstash. This makes it a great choice for cloud and containerized environments such as a kubernetes cluster
- ElasticSearch
- ElasticSearch is an analytics and search engine for all types of data. We will used it to ingest and store our logs in the file system
- Kibana
- Kibana is a user interface that lets you visualize your ElasticSearch data. We will used it to visualize our cluster logs in table and charts
All the code in this tutorial can be found here
Minikube
For this tutorials we will used a k8s cluster that runs locally on your computer. We will achieve this using minikube. If you havent already, please go ahead and install it.
In order to follow along with the tutorial, aside from minikube resource requirements, you will also need, at least, 15GB of free RAM
Once you have minikube set up, you are ready to get started :smile:
Step 1: Start your cluster
minikube start
Step 2: Enable csi-hostpath-driver minikube addon
minikube addons enable csi-hostpath-driver
step 3: (Optinal) Run Kubernetes Dashboard UI
- The kubernetes dashboard can be handy in seeing what's going on in your cluster
minikube dashboard
step 4: Create a Namespace
- A namespace is
virtual clusterabstraction in k8s. Names of namespaced resources & objects need to be unique with a namespace but not accross namespaces. - Get a list of namespaces currently running in your cluster:
apiyo@castle:kube-logging$ kubectl get namespaces
NAME                   STATUS        AGE
cert-manager           Active        35d
default                Active        69d
ingress-nginx          Active        66d
kube-node-lease        Active        69d
kube-public            Active        69d
kube-system            Active        69d
kubernetes-dashboard   Active        66d
monitoring             Active        63d
- Create a new namespace by creating a
namespace.yamlfile with the following content
kind: Namespace
apiVersion: v1
metadata:
  name: kube-logging
- Run the following command
kubectl apply -f namespace.yaml
- Verify that the namespace was created
NAME                   STATUS   AGE
cert-manager           Active   35d
default                Active   69d
ingress-nginx          Active   66d
kube-logging           Active   5s
kube-node-lease        Active   69d
kube-public            Active   69d
kube-system            Active   69d
kubernetes-dashboard   Active   66d
monitoring             Active   63d
step 4: Create the ElasticSearch StatefulSet
- Create
elasticsearch_statefulset.yamland paste/type in the following YAML:
apiVersion: apps/v1
kind: StatefulSet
metadata:
  name: es-cluster
  namespace: kube-logging
spec:
  serviceName: elasticsearch
  replicas: 3
  selector:
    matchLabels:
      app: elasticsearch
  template:
    metadata:
      labels:
        app: elasticsearch
    spec:
      containers:
      - name: elasticsearch
        image: elasticsearch:7.2.0
        resources:
          limits:
            memory: 4096Mi
            cpu: 1000m
          requests:
            cpu: 100m
        ports:
        - containerPort: 9200
          name: rest
          protocol: TCP
        - containerPort: 9300
          name: inter-node
          protocol: TCP
        volumeMounts:
        - name: es-pv-home
          mountPath: /usr/share/elasticsearch/data
        env:
          - name: cluster.name
            value: k8s-logs
          - name: node.name
            valueFrom:
              fieldRef:
                fieldPath: metadata.name
          - name: discovery.seed_hosts
            value: "es-cluster-0.elasticsearch,es-cluster-1.elasticsearch,es-cluster-2.elasticsearch"
          - name: cluster.initial_master_nodes
            value: "es-cluster-0,es-cluster-1,es-cluster-2"
          - name: ES_JAVA_OPTS
            value: "-Xms512m -Xmx512m"
      initContainers:
        - name: fix-permissions
          image: busybox
          command: ["sh", "-c", "chown -R 1000:1000 /usr/share/elasticsearch/data"]
          securityContext:
            privileged: true
          volumeMounts:
            - name: es-pv-home
              mountPath: /usr/share/elasticsearch/data
        - name: increase-vm-max-map
          image: busybox
          command: ["sysctl", "-w", "vm.max_map_count=262144"]
          securityContext:
            privileged: true
        - name: increase-fd-ulimit
          image: busybox
          command: ["sh", "-c", "ulimit -n 65536"]
          securityContext:
            privileged: true
  volumeClaimTemplates:
  - metadata:
      name: es-pv-home
      labels:
        type: local
    spec:
      accessModes: [ "ReadWriteOnce" ]
      storageClassName: csi-hostpath-sc
      resources:
        requests:
          storage: 10Mi
- This will create a statefulset, and along with it persistent volumes for each pod in the stateful set.
- To examine the persistent volumes created:
kubectl -n kube-logging get pv - In addition, it'll run some init containers that will set things up before the
elasticsearchcontainer starts - Create the statefulset by running the following:
apiyo@castle:kube-logging$ kubectl apply -f elasticsearch_statefulset.yaml
statefulset.apps/es-cluster created
- You can wait for all the 3 pods of the statefulset to start by running
watch kubectl -n kube-logging get pods
step 4: Create the ElasticSearch Service
- Create
elasticsearch_svc.yamland paste/type in the following YAML:
kind: Service
apiVersion: v1
metadata:
  name: elasticsearch
  namespace: kube-logging
  labels:
    app: elasticsearch
spec:
  selector:
    app: elasticsearch
  clusterIP: None
  ports:
    - port: 9200
      name: rest
    - port: 9300
      name: inter-node
- This service is needed to allow communication between ElastiSearch nodes and also from outside the cluster
- Create the svc by running the following:
apiyo@castle:kube-logging$ kubectl apply -f elasticsearch_svc.yaml
service/elasticsearch created
- To verify that the service was created ok
apiyo@castle:kube-logging$ kubectl -n kube-logging get svc
NAME            TYPE        CLUSTER-IP   EXTERNAL-IP   PORT(S)             AGE
elasticsearch   ClusterIP   None         <none>        9200/TCP,9300/TCP   11s
- In order to be able to access the
elasticsearchcluster from our host computer, forward the ES port as follows
apiyo@castle:kube-logging$ kubectl port-forward es-cluster-0 9200:9200 --namespace=kube-logging
Forwarding from 127.0.0.1:9200 -> 9200
Forwarding from [::1]:9200 -> 9200
- Verify you can access your
elasticsearchcluster by running:curl http://localhost:9200/_cluster/state?pretty
step 4: Create a kibana deployment
- Create
kibana.yamland paste/type in the following YAML:
apiVersion: v1
kind: Service
metadata:
  name: kibana
  namespace: kube-logging
  labels:
    app: kibana
spec:
  ports:
  - port: 5601
  selector:
    app: kibana
---
apiVersion: apps/v1
kind: Deployment
metadata:
  name: kibana
  namespace: kube-logging
  labels:
    app: kibana
spec:
  replicas: 1
  selector:
    matchLabels:
      app: kibana
  template:
    metadata:
      labels:
        app: kibana
    spec:
      containers:
      - name: kibana
        image: kibana:7.2.0
        resources:
          limits:
            cpu: 1000m
            memory: 2048Mi
          requests:
            cpu: 100m
        env:
          - name: ELASTICSEARCH_URL
            value: http://elasticsearch:9200
        ports:
        - containerPort: 5601
- This will create both a kibana service and a deployment
- Create both these resources by running the following:
apiyo@castle:kube-logging$ kubectl -n kube-logging apply -f kibana.yaml
service/kibana created
deployment.apps/kibana created
- Verify that the kibana pod was created ok as follows:
apiyo@castle:kube-logging$ kubectl -n kube-logging get pods
NAME                      READY   STATUS    RESTARTS   AGE
es-cluster-0              1/1     Running   0          15m
es-cluster-1              1/1     Running   0          15m
es-cluster-2              1/1     Running   0          14m
kibana-7595dd5f5f-j87qw   1/1     Running   0          77s
You could also check it's logs by running:
kubectl -n kube-logging logs kibana-7595dd5f5f-j87qwIn order to be able to access
kibanafrom our host computer, forward the kibana container port as follows
apiyo@castle:kube-logging$ kubectl port-forward kibana-7595dd5f5f-j87qw 5601:5601 --namespace=kube-logging
Forwarding from 127.0.0.1:5601 -> 5601
Forwarding from [::1]:5601 -> 5601
step 5: Deploy fluentbit!
- For this one, we will use helm
- If you haven't installed helm yet, follow the instructions here
- Create
fluentbit.yamland type/paste the following YAML:
---
image:
  repository: onaio/fluent-bit
  tag: "1.9.3-hardened"

config:
  ## https://docs.fluentbit.io/manual/pipeline/inputs
  inputs: |
    [INPUT]
        Name  tail
        Path  /var/log/containers/*.log
        multiline.parser  docker, cri

    [INPUT]
        Name  cpu
        Tag   cpu

  ## https://docs.fluentbit.io/manual/pipeline/filters
  # filters: |
  #   [FILTER]
  #       Name k8s
  #       Match *
  #       Tag k8s

  ## https://docs.fluentbit.io/manual/pipeline/outputs
  outputs: |
    [OUTPUT]
        Name            es
        Match           *
        Host            elasticsearch
        Port            9200
        Generate_ID     On
        Logstash_Format On
        Logstash_Prefix fluent-bit-temp
        Retry_Limit     False
        Replace_Dots    On
## how to deploy
# helm upgrade -n kube-logging -f fluentbit.yaml fluent-bit fluent/fluent-bit
Add the fluent helm repo:
helm repo add fluent https://fluent.github.io/helm-chartsInstall fluentbit as follows:
apiyo@castle:kube-logging$ helm upgrade --install -n kube-logging -f fluentbit.yaml fluent-bit fluent/fluent-bit
Release "fluent-bit" does not exist. Installing it now.
NAME: fluent-bit
LAST DEPLOYED: Thu Oct 13 22:10:28 2022
NAMESPACE: kube-logging
STATUS: deployed
REVISION: 1
NOTES:
Get Fluent Bit build information by running these commands:

export POD_NAME=$(kubectl get pods --namespace kube-logging -l "app.kubernetes.io/name=fluent-bit,app.kubernetes.io/instance=fluent-bit" -o jsonpath="{.items[0].metadata.name}")
kubectl --namespace kube-logging port-forward $POD_NAME 2020:2020
curl http://127.0.0.1:202
Step 6: Explore data collected by fluentbit
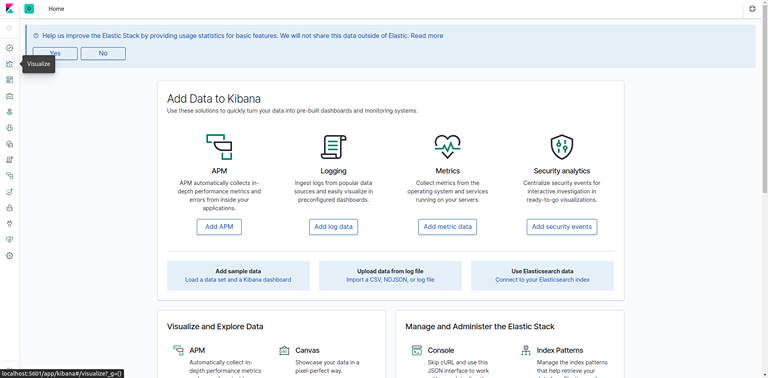
- Navigate to
http://localhost:5601/ - Click on Discover in the left-hand navigation menu:

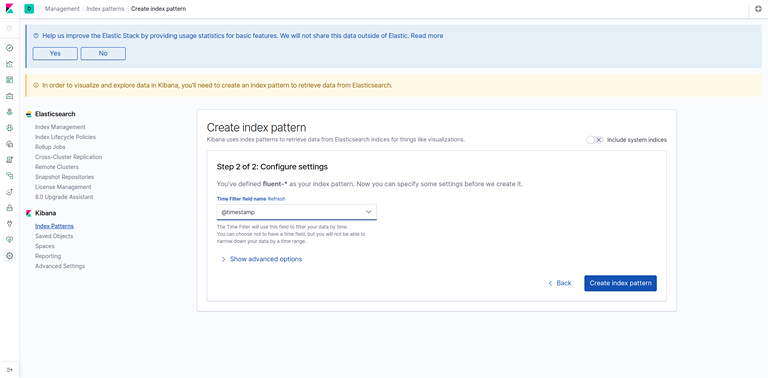
- You should see the following configuration window:

- This allows you to define the Elasticsearch indices you’d like to explore in Kibana. To learn more, consult Defining your index patterns in the official Kibana docs. For now, we’ll just use the fluent-* wildcard pattern to capture all the log data in our Elasticsearch cluster. Enter fluent-* in the text box and click on Next step.
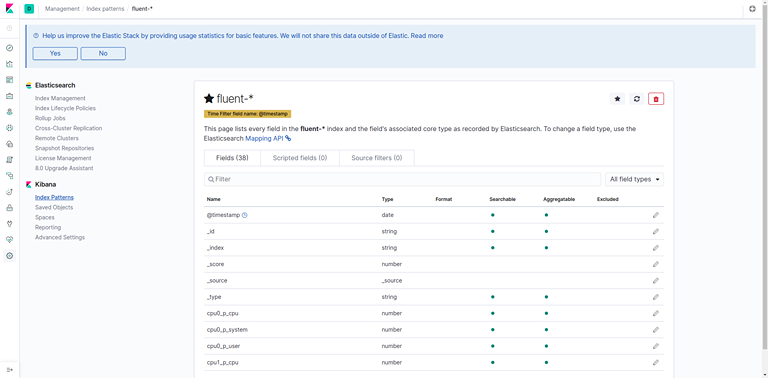
- Click on next, and then in the dropdown hit Create index pattern.

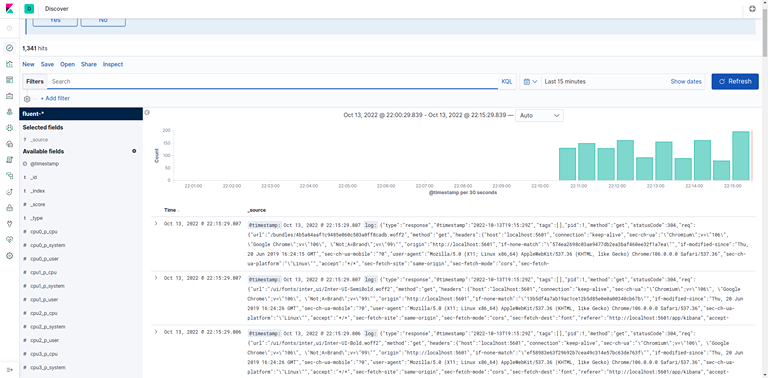
Now, hit Discover in the left hand navigation menu.
You should see a histogram graph and some recent log entries:

- At this point you’ve successfully configured and rolled out the EFK stack on your Kubernetes cluster. To learn how to use Kibana to analyze your log data, consult the Kibana User Guide.
Step 7: Resource teardown
- You can clean up all the resources we created here in one command
apiyo@castle:kube-logging$ kubectl delete namespace kube-logging
namespace "kube-logging" deleted